Wednesday, July 5, 2017

Movies on some aspects of weaving on a Warp-Weighted Loom

I made some movies for a class on the WWL. How to tablet weave the starter band, how to knit continuous heddles, how to crochet the spacing cord, and how to tie/retie the weights after rolling up the cloth on the cloth beam. I was setting up for tabby, but the essentials also hold for twill.

Warping the loom:


Knitting the crochet spacing cord:


Knitting the heddles:

Redoing the weights:

Find a handout that accompanies these movies at:
https://www.academia.edu/33710255/You_too_can_warp_and_weave_on_a_Warp-Weighted_Loom

Weaving twill on a Warp-Weighted Loom

Here is a movie of weaving broken diamond twill on my warp-weighted loom:


I warped the loom using a diagram by Martha Hoffmann based on an extend piece from an excavation in Kaupang from the 9th century A.D.:


Martha Hoffmann also provides a diagram for knitting the heddles based on this piece:


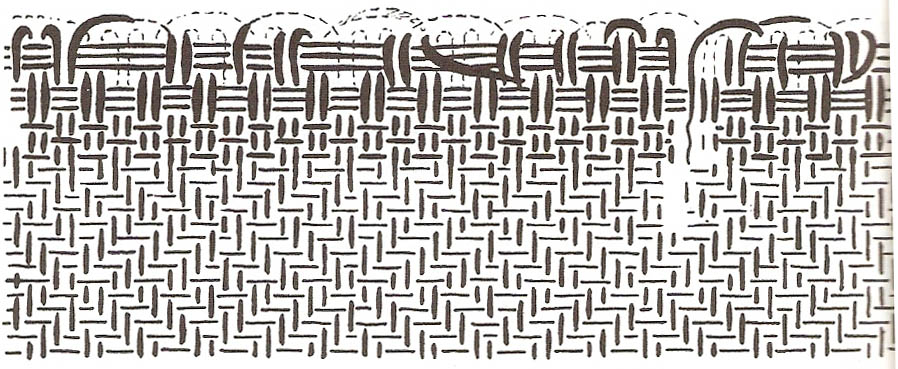
To aid the knitting of the heddles, I drew simplified diagrams for the heddles for each heddle rod:

Figure 1: Heddles diagram for the upper or “1” rod.

Figure 2: Heddles diagram for the middle or “2” rod (the opposite of the natural shed).

Figure 3: Heddles diagram for the lower or “3” rod.

To reproduce the broken diamond twill pattern of the extent fabric fragment above, the order of the heddle rods is a sequence of ten sheds: N-3-2-N-1-2-3-N-2-1, where “N” designates the natural shed and “1”, “2” and “3” the shed created by pulling forward the respective top, middle or bottom heddle rod.

Figure 4: Close-up of a piece of the woven fabric.

Bibliography

Hoffman, Marta (1974) “The Warp-Weighted Loom: Studies in History and Technology of an Ancient Implement”, Robin and Russ Handweavers.

Thursday, June 29, 2017

Viking hand bag based on the Haithabu / Hedeby find.

I had started the first test weave on my warp-weighted loom and was looking for an application. The original plan was to make a Viking hood, but for various reasons the weave ended up being too narrow to be practical. I already had a so-called Haithabu bag made for me by a family member and realized that this test weave was the perfect size for one made by myself. I have always loved woodworking and the wooden handles that define this type of bag made it the perfect combination for an interesting A&S project.

 
Historical background

The name of the bag is derived from Haithabu (German) or Hedeby (English) after the location of an archaeological excavation in present-day Germany. The excavation yielded a number of narrow carved wooden pieces, rounded and with holes on both ends and a set of narrow elongated slots along the straight length (Figure 1). Some of the pieces had textile remnants through the slots, although nothing survived to the present day. The current interpretation is that they are bag handles after comparison with an earlier Sami find (Figure 2). They have a surprisingly simple but effective design; the wooden handles hold and maintain the shape of the bag and a single shoulder cord through the holes allows you to carry it, while keeping the bag closed at the same time.

Figure 1: Photograph of the wooden bag handles on display in the Haithabu Museum (http://europa.org.au/index.php/articles/21-bags).

Figure 2: Photograph of a Sami leather bag with antler handles .

A total of fourteen pieces where found at the Haithabu excavation site. Five are made from ash, five others from maple and the remaining four are not specified. They have rounded ends with holes drilled through for the carrying cord. The bottom edges are mostly straight, the top edges are wavy or with notches. Elongated slots along the bottom serve to attach the bag. Dimensions vary from 181 to 496 mm in length (Figure 3), a thickness of 7 to 13 mm, and 29-52 mm wide in the center part. The semicircular ends have diameters ranging from 31 to 61 mm, and have a 7 to 10 mm diameter (drilled) hole in the center. Two of the pieces were identical (HbH.119.001-002), i.e. a pair, and it is therefore assumed that the others should all have been part of pairs.

Figure 3: Four of the wooden pieces, ranging in length from 181 to 496 mm: HbH.119.003, HbH.119.012, HbH.119.013, and HbH.119.014 (top to bottom).

Creating the bag handles

I decided to create an accurate reproduction of the HbH.199.003 wooden handles. This choice was partially a matter of taste, but mostly a matter of size. The original size of this handle is 181 mm, which is almost a perfect match to the width of the fabric that I planned to use for the bag. I started by copying and scanning the top handle in Figure 3. The design was then enlarged and printed to get a length of 205 mm, slightly larger than the original, but a better match with the fabric. From the ratio of the length and thickness in Figure 3, I computed a corresponding thickness of about 9 mm. Since the original piece was damaged along the top, curved arches were added in a way that looks consistent with and in good proportion to the curved end pieces and the overall design.

Florian Westphal does not list the wood type for this particular handle, so I decided to use ash given that five of the fourteen handles were made from ash and the fact that a suitable ash log was available to me (a leftover piece of the ash logs that I harvested for another project). The log was split along the centerline with an ax into five boards. The center board was discarded in favor of the two boards on either side. This ensures that the wood grain is predominantly parallel with the face of the handle, avoiding potentially weak spots at the slot locations. The two boards were then shaped to the correct thickness and to a slightly larger outer dimension using an ax, a draw blade and a coarse rasp and finished with a file to a smooth outer surface.

The outline of the handle and the locations of the holes for the shoulder strap and the other five holes were traced onto each board using the real size printed design. The holes were cut out using a drill and chisels and finished with several files. When everything else was completely finished, the outline was cut out with a saw. The final handles were finished with linseed oil to help preserve and protect the wood.

The tools required to make the handle (axe, hammer, several chisels and files, rasp, draw blade, saw, and spoon drills) were quite common in Viking Age Haithabu. Examples of all these tools were found in the Mästermyr chest, a Viking Age tool chest from Gotland. Functionally identical modern versions of these hand tools were used to create the handles with the exception of the spoon drills and the saw. I have not yet laid my hands on spoon drills, so a modern drill was used instead. Due to an elbow injury, use of a handsaw was not an option, so a band saw was used to cut the outline of the handles.

Figure 4: Reconstruction of the HbH.119.003 handle.

Weaving the fabric for the bag

There is no actual archaeological evidence for the bags that went with the Haithabu handles, but we can make an educated guess as to the shape, size and material. The width is dictated by the length of the handles, while pictorial evidence of period shoulder bags suggests an almost square form. The Sami bag in Figure 2 was made from leather, but textile evidence with some of the Haithabu handles at the time of excavation makes it plausible that fabric was used as well. I settled on the latter, since my motivation for this project stemmed from the desire to make something nice and useful with my first piece of hand woven cloth.

The cloth for the bag was woven on a reproduction Viking Age warp-weighted loom. A tablet woven band was used as the starting band for the warp. The same (store bought) wool was used for the warp and the weft. The loom was setup for plain tabby weave with a warp count of about 6/cm, and a weft count about 4/cm. A single piece, the full width of the woven fabric, was used for the front, the bottom and the back of the bag. Two additional pieces, half the width of woven fabric were used for each side, they are added to allow the bag to open wide enough for practical use. Selvage on both sides was obtained by weaving both sides at the same time after splitting the warp in two equal sections (Figure 5).

Figure 5: The finished fabric before cutting it in three pieces.

Assembling the bag

The three pieces of fabric for the bag were hand sewn together. Running stitch was used to join each seam; both edges were then folded down and secured with a whip stitch. The top of the bag was hemmed by folding the edges back once and whip stitch along the raw edge. A linen liner was added to protect the wool fabric and make the inside of the bag stronger for practical use. The liner was assembled in a similar fashion with the exemption of the reversed seams and hems. The outer wool fabric and the liner were joined with a running stitch along the hems.

After the bag was completed, the wooden handles were attached with a thick yarn stitched through the hems and looped through the elongated slots. Finally, a shoulder band was braided from three strings of leather and tied to the bag handles through the holes in each of the round ends.

Learning points

Handles:
Using period hand tools for wood working is fun and surprisingly efficient. I hope to get spoon drills in the near future, so that I can experiment with those as well.

Weaving:
While weaving the header band, I passed only a single weft tread for each turn of the cards (this becomes the warp on the loom), resulting in a fairly open warp, making it hard to maintain a constant width during the weaving. In a current weaving project, I passed two weft threads for each quarter turn of the cards, reducing this issue significantly. To prevent “sagging” of the warp, it must be tied to the cloth beam at more positions.

Shoulder strap:
The braided leather band is a bit to thick and stiff for easy opening and closing of the bag. I plan to either weave or braid a cloth shoulder band to replace the current leather strap.

Find a downloadable version of this post with its companion photo journal at:
https://www.academia.edu/33710073/Viking_hand_bag_based_on_the_Haithabu_find

Bibliography

Arwidsson, Greta and Berg, Gosta (1999), “The Mästermyr Find: A Viking Age Tool Chest from Gotland”, Larson Publishing Company (Lompoc, CA)

Johnson, Jennifer (2015) “Viking Stitchery”, SCA class handout by Hefðharkona Reyni-Hrefna.

Schietzel, Kurt (2014) “Spurensuche Haithabu: Archäologische Spurensuche in der frühmittelalterlichen Ansiedlung Haithabu. Dokumentation und Chronik 1963-2013”,
Wachholtz Verlag, Murmann Publishers (Neumünster/Hamburg).

Westphal, Florian (2006) “Die Holzfunde von Haithabu”, Wachholtz Verlag (Neumünster).

Creating wooden handles for a Hedeby wood handled bag.

A photo Journal of making the wooden handles for a Hedeby bag from scratch. Except for a modern drill (I don't have spoon bits yet, but I'm working on that), only hand tools were used that were readily available in period: an ax to split the log, a draw blade and a course file to shape the boards, a saw to cut the outline, a drill and various chisels to create the slots and several files to finish the surface.

Splitting an ash log to create the board for the bag handles. The log was split into five pieces. The two boards on either side of the center piece were used for the bag handles.

The two boards after splitting.

Tracing the outline from the printed design onto the wooden boards.

The finished slots of the first handle.

The finished handles.

Plain weave fabric for a Hedeby wood handled bag

A photo Journal of weaving fabric for a Viking hand bag on a warp weighted loom. Below is the finished bag after attaching the handles and adding the leather braided shoulder strap.


Creating the fabric for the bag start with tablet weaving the starter band. The weft of the band becomes the warp for the loom. By looping the thread around the last peg, and bundling the threads on either side before cutting in the middle, the warp splits naturally into the front and back warp.

The tablet woven starter band.

Attaching the header band to the cloth beam.

Knitting the heddles.

Weaving in progress. The loose loops in the weft before changing the shed and beating the weft are required to maintain an even weave of constant width.

Getting somewhere...

Et voilà: my very first weave from a warp-weighted loom. The top part becomes the front, bottom back of the bag. The two narrow parts at the bottom become the sides.

The assembled bag. A linen liner (store bought) was added to protect the wool fabric during use and to strengthen the bag.

Photo Journal Viking Belt

Creating the tablet weaving loom


Assembling the warp weighted tablet weaving loom that I designed and created for this project. Although I could not find historical evidence, I think the design is plausible. It greatly helped me to easily experiment with loom tension.

Weaving the belt

The warp setup length was 105 inch, the length of the woven belt after completion was 75 inch.

Warping the loom.

I started and always kept the ground and the brocading weft spools on opposite sides. That way I notice it right away when I have forgotten a pass. I always pass the brocading weft first, then the ground weft followed by a quarter forward turn of the cards and a beating of the weft.

The start of the weaving.

The loom weights are about 300 gram each. I attached the 20 warp threads of 5 cards in one bundle to each weight.

The loom weights. I think Lego should be period...

The finished belt was secured around the bar and wound up as I went along to keep a pleasant working distance from where I was sitting.

Over halfway done.

Passing the brocade weft behind complete cords to get a negative pattern on the bottom side of the belt.

The finished belt.

A Viking belt based on the Birka B21 band; 800-975 CE Sweden.

I was in need of a specific belt for a special occasion and was searching for ideas that would fit a male Viking persona. Initially, I focused on leather, but leather working has not yet captured my interest and I was procrastinating. Then, I took two tablet weaving classes at Fiber, Fabric & Fighting XIV and that resonated with my growing interest in all things weaving. The classes “Who’s afraid of brocade” by Lord Silvester Burchardt and “Warp float patterning (Snartemo): Yes, you can do it!” by Mistress Rosalind Ashworthe, gave me the inspiration, motivation and confidence that I could tablet weave a belt that would suit me. Particularly since Silvester’s class had several examples of brocaded bands from archeological finds originating from Birka, the commercial center of Sweden in the Viking age.

My finished green belt, of contrasting dark and light green silk.

I read and translated several relevant sections of “Birka III, die Textilfunde aus den Grabern” by Agnes Geijer (1938) to get an overview of the bands found in the Birka graves: their designs, dimensions and the materials and techniques that were used to create them. I fairly quickly gravitated to the B21 design. It has an intricate, appealing and well balanced design and suitable dimensions.

Historical background

Archeological research conducted by Hjalmar Stolpe in the years 1871 to 1881 showed with all certainty that the Viking settlement Birka on the island of Björkö in the Lake of Mälar in present-day Sweden was the commercial center of Sweden during the Viking Age. For almost two centuries, from about 800 to 975 CE, Birka served as an important trading center between Viking age Scandinavia and Western Europe and with the Orient through the trade routes in Russia. Die Kungl. Vitterhets Historie och Antikvitets Akademien commissioned Holger Arbman in 1931 to catalogue the enormous wealth of artifacts found in the Birka archeological sites. Agnes Geijer republished an extensive survey of the textile fragments from the Birka graves in 1938. This publication contains a complete chapter on the Birka bands (see Figure 1 for examples of some of these bands, including the one labeled as B21).

Technique, material and design
   
Virtually all the Birka bands are woven on tablets with four holes. A large variation of designs can be created by using differently colored threats in the different holes and turning the cards in a specific order, backward or forward, as individual cards or in groups. An alternative, and for me a more attractive, way of creating a pattern is by brocading with a contrasting color or with gold or silver thread. The B21 band is of the latter type. It consists of: (a) the basic ground weft that binds the warp threads together, hidden by them in the usual way, and (b) a second, brocading weft of double drawn silver wire, creating the actual pattern or design. The brocading weft consists of a pattern of floats and hidden sections by passing the weft underneath one or more warp threads of one or more cards.

Most of the Birka bands show a mix of repeating patterns, like diamonds, stars, swastikas or geometric patterns of diagonals lines (Figure 2). What sets the B21 design apart is the unique and very uniform base design, combined with two distinctive motives that stretch the full width of the band. Another attractive aspect of the B21 band is that both the warp threads and the ground weft are silk and a fairly long piece is almost completely preserved. This in contrast with many of the other bands, where to save on expensive silk a cheaper material like linen was used for the hidden threads. Here, the linen has decomposed completely over time making it impossible to determine the exact type of weave.

 (1)                 (2)                (3)              (4)

Figure 1: Examples from several bands : (1) B6-7, grave 965, (2) B21, grave 943, and (3)-(4) B19, grave 965.
  Figure 2: Examples of several patterns: (a) B6, (b) B22, (c) B20, (d) B19, (e) B21, and (f) my own reproduction of the pattern.


Details of the B21 band

Warp on 17 cards, four holes in each card, with silk threads in all four holes. Silk ground weft. A brocade of double drawn silver wire, tied down with two threads per cord. No stave border. All cards rotated in sync with quarter turns forward, leading to a completely smooth and uniform underside. Weft count 18/cm, width 10 mm (warp count 68/cm, length 25 cm).

Weaving the belt

I started by designing and building a warp weighted tablet weaving loom. Although I think the design is plausible, I have found no historical evidence for this particular design. I picked it because of an interest in Viking age warp weighted looms, but more importantly because as a total newbie to tablet weaving, I wanted a tool that allows me to experiment with warp tension in a consistent and deterministic manner.

The warp was created one card at the time, threading back and forth twice per card. The cards were warped alternating S and Z (to eliminate fouling of the warp threads during turns), mirrored with respect to the center. After warping the loom, I experimented a bit with warp tension and thread thickness to get roughly the warp and weft counts of the original band. I decided to add a stave border to the band increasing the full width to 25 cards in order to get a width and design that appealed more to me, keeping in mind its practical use. I also deviated from the original by passing the brocading weft under all four instead of two threads of the cord. This creates an inverted pattern at the underside, instead of a smooth and uniform underside, again appealing more to me for its practical use. As in the original, all cards are collectively rotated forward one quarter turn for each successive passage of the ground and brocading weft. The unfinished warp threads were periodically untwisted to eliminate the build-up twist.

After some trial and error, I ended up using 2/20 silk, which resulted in a width of 18 mm and a warp count of 56/cm. Using 2/20 silk for the ground weft and brocade resulted in elongated patterns, even at a relatively low warp tension, so I ended up using 2/60 silk for the ground weft and 2/20 for the brocade, which combined with a warp tension of 15g/thread resulted in a total weft count of 18/cm. The final woven length of the band is 75 inch.

Learning points

I found tablet weaving and brocading a very rewarding and surprisingly relaxing past time (even though it was slow going). The correct tension in the warp is crucial for the final weft count and I think that the initial experimenting with different warp tension and thread thickness paid of to get the look of the original band. Surprisingly, using a single weight for the four warp threads of each card, instead of combining several cards and using a larger weight, does affects the weft count, even when using the same weight per warp thread. It does have the benefit of easy untwisting of build-up twist.

Find a downloadable version of this post with its companion photo journal at:
https://www.academia.edu/33710000/A_Viking_belt_based_on_the_Birka_B21_band_800-975_CE_Sweden

Bibliography

Arbman, Holger (1940) “Birka I: Die Gräbern”, Kungl. Vitterhets Historie och Antikvitets Akademien (Uppsala).

Burchardt, Silvester (2016) “Who’s afraid of brocade” (class handout)

Collingwood, Peter (1982) “The Techniques of Tablet Weaving”, Echo Points Books & Media (Vermont)

Geijer, Agnes (1938) “Birka III: Die Textilfunde aus then Gräbern”, Kungl. Vitterhets Historie och Antikvitets Akademien (Uppsala).

Stolpe, Hjalmar (1878, 1880) “Meddelanden frän Björkö”, Kungl. Vitterhets Historie och Antikvitetsak-ademiens Mänadsblad.

Gold brocaded headband inspired by a find from the Shestovica cemetery; Second half 10th century AD, Chernigov, Ukraine

I was looking for a project to try something new with tablet weaving: brocading with metallic thread. A headband as part of the Wardrobe Pro...