Wednesday, April 25, 2018

Making bone tablet weaving tablets

I love tablet weaving and enjoy studying its use and history in addition to trying out the many different types of tablet weaving itself. Part of this invariably comes down to the question of what tools were used in historic times. Tablet weaving is a very popular technique for weaving narrow bands for belts or trim. It is a weaving technique that requires very little investment beyond the actual thread for the product itself, making it affordable for many of us. The only tools that are required are a set of tablets. You do not even need a loom to get started, your belt and a nearby doorknob or tree are sufficient to start weaving simple patterns. So this project focuses on the key ingredient that gives the technique its name: the tablets.


Historical background

It is hard to say when or where tablet weaving was invented. As Peter Collingwood so aptly says: “a distinction has to be drawn between the earliest known fabrics that could have been tablet woven and those which in all probability were so woven.” In his book, he presents a chronological list of the most important historical finds from the earliest ones in bog burials in modern day Germany dating back as far as the 6th century BC to the year 1000 AD, after which too much material survives to make a brief summary feasible. He also gives a brief history of the most important archaeological finds of tablets. Existing remains of historical tablets show that they were made from a variety of materials, including wood, bone, antler, ivory, bronze and leather. The earliest tablets that were identified as used in tablet weaving come from a cave at El Gigarrelejo in Spain. They were the charred remains of four or five beach wood tablets, 3.0 cm square with four large holes. Nancy Spies (2000) gives a detailed list of existing tablets based on the type of material that they are made of. Figures 1 and 2 give some examples of bone and wooden tablets of various shapes.

Figure 1: Several examples of bone tablets found at Jarlshof in Shetland, at the Broch of Burrian on North Ronaldsay in Orkney, at Harbour Broch at Keiss in Caithness, at Keil Cave in Argyll and at Tain in Ross-shire. They are dated between 200 B.C and 400 A.D. Their sizes range from 3.2 cm for the smaller round tablets to 4.4 x 5.0 cm for the largest triangular tablet.

Figure 2: Wooden tablets from Antinoë, Egypt dated to the 4th to 5th century A.D.

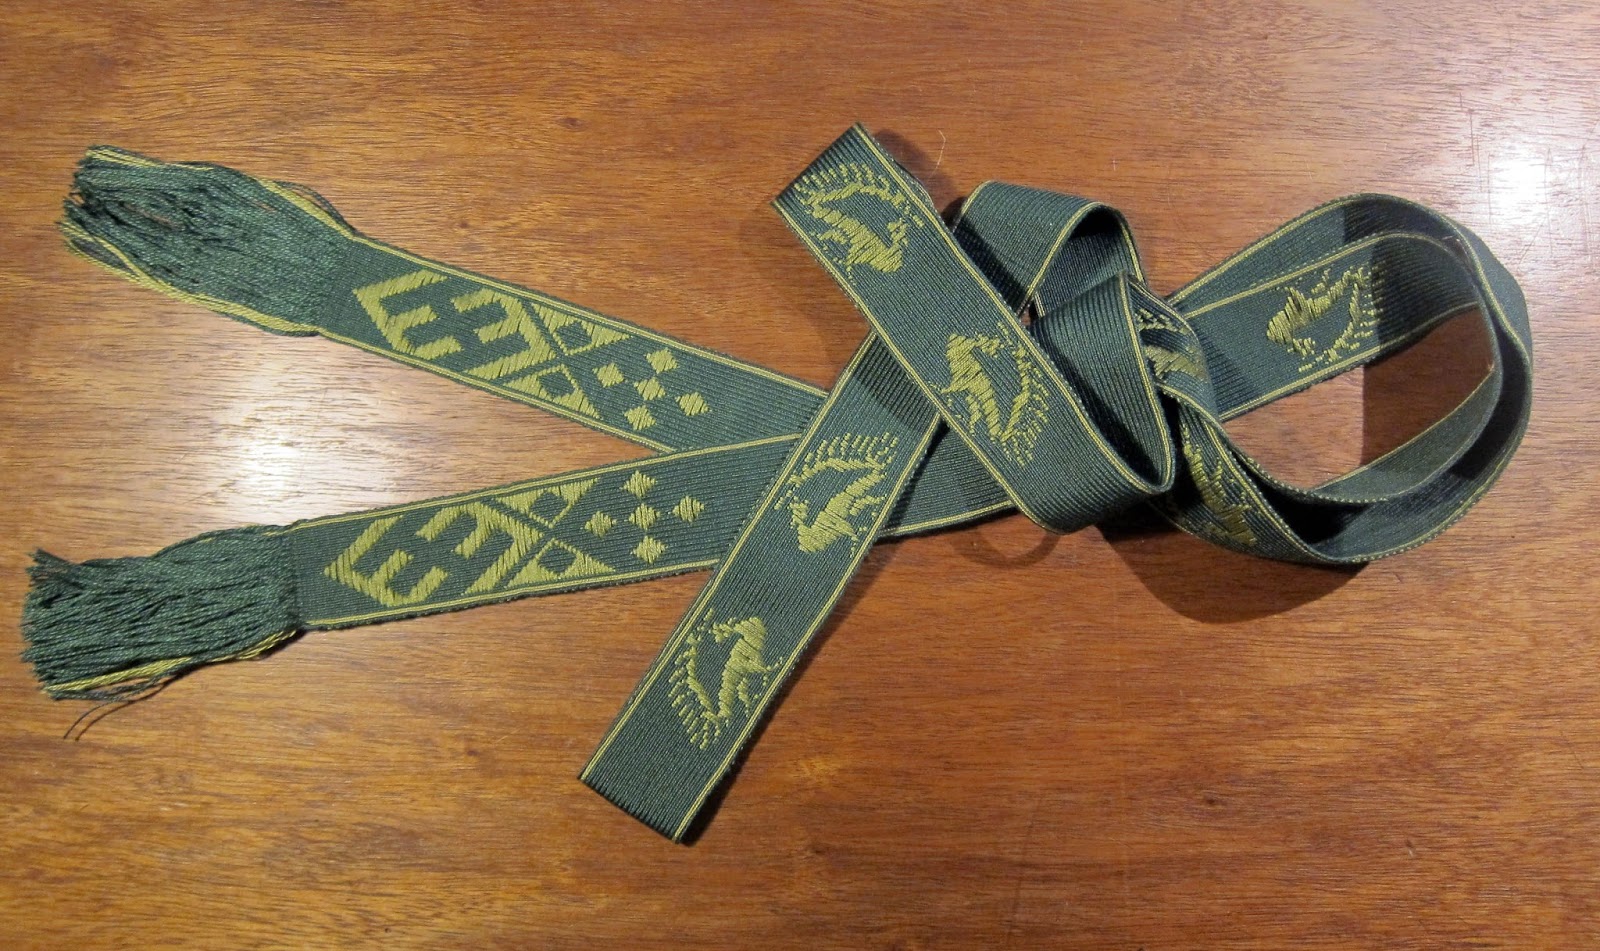
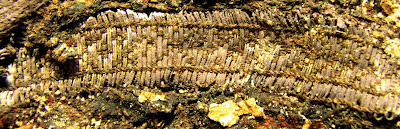
Arguably the most famous example is shown in Figure 3, a linen brocaded band with its warp still threaded to a set of 52 tablets, found in the Oseberg ship burial in Norway and dated to the 9th century A.D.

Figure 3: A set of threaded tablet weaving tablets found in the Oseberg ship burial in Norway.

Material and design

The inspiration for my project was a bone tablet with incised decorations found at Alchester, England. The excessive thread marks in the corner holes suggest that this tablet was mostly used with four threads, one through each corner. The decorations punctured by the holes along the left and right edge of the tablet and the absence of noticeable thread marks there suggest that these two holes were added at a later time.

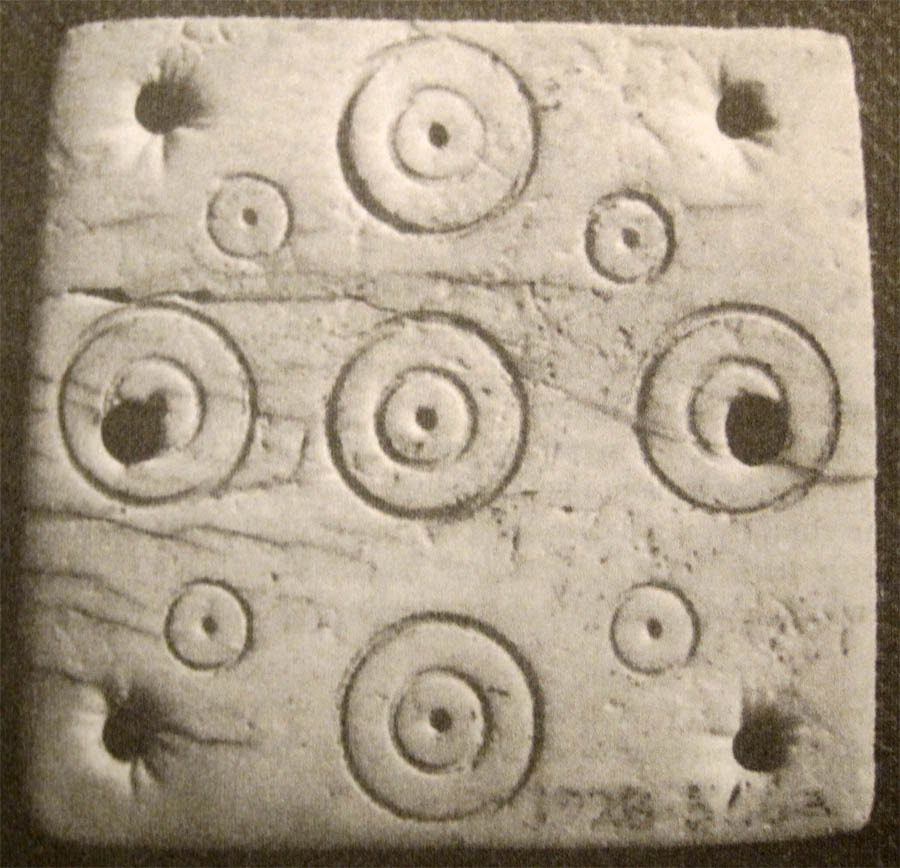
Figure 4: Bone tablet found at Alchester England; Roman (Asmolean Museum, Oxford).

These types of bone tablets were most likely made from the shoulder blades of domestic or hunted animals. Shoulder bones have a relatively flat and thin central part that is very suitable to making tablets. Since I had deer shoulder blades available to me, I decided to make the tablets from deer bone. As discussed below, I simplified the design a little due to the thinness of the central part of the shoulder bone. I decided to only incise single circles at the same locations as the double circles in the extant piece and to omit the others.

Making the tablets

The first tablet I made was a bit of a learning curve. I wanted to use tools that are as close to period as I can and we recently bought from Deagrad Tools in Sheffield, England, several hand forged ring and dot augers and a hand forged comb makers hacksaw based on the Mästermyr find (Gotland, Sweden, ca. 1000 A.D.). I started out with cutting off the thick piece of the shoulder bone with the hacksaw and that proved to be a mistake. Although the saw is specifically designed to saw through bone and antler, it proved too coarse for the much more delicate shoulder bone. When I was almost through, the thinner flat central part of the shoulder bone fractured due to the stress of the sawing action. There was still enough left to make one small tablet, but since the structure of the remaining part was already severely compromised I finished cutting it to size with a modern band saw.

I do not have period augers or spoon drills, so I experimented a bit with drilling holes in one of the leftover pieces by positioning the sharp point of a knife at the correct location for a hole and rotating the blade clockwise and counter clockwise under slight downward pressure. This proved surprisingly efficient and I had scraped out a nice round hole in no time. The edge and the rounded corners were shaped and smoothed using a modern file as a substitute for a period one (another item still on my tool wish list). The end result was a 3.5 cm square tablet with a hole in each of the corner (see Figure 6 on the right). Although a bit smaller than intended, well within the size range of bone tablets found in Roman Britain between the 1st and 4th century A.D.

Figure 6: The first completed tablet (undecorated).

Having learned from the earlier mistakes, I decided to try and make a second tablet without having to resort to a modern band saw. I cut a triangular slot from a board to support the thick parts of the shoulder blade. I then positioned the shoulder blade over the slot allowing me to cut out the thin flat center piece of bone with a fine dovetail saw (see Figure 7 below).

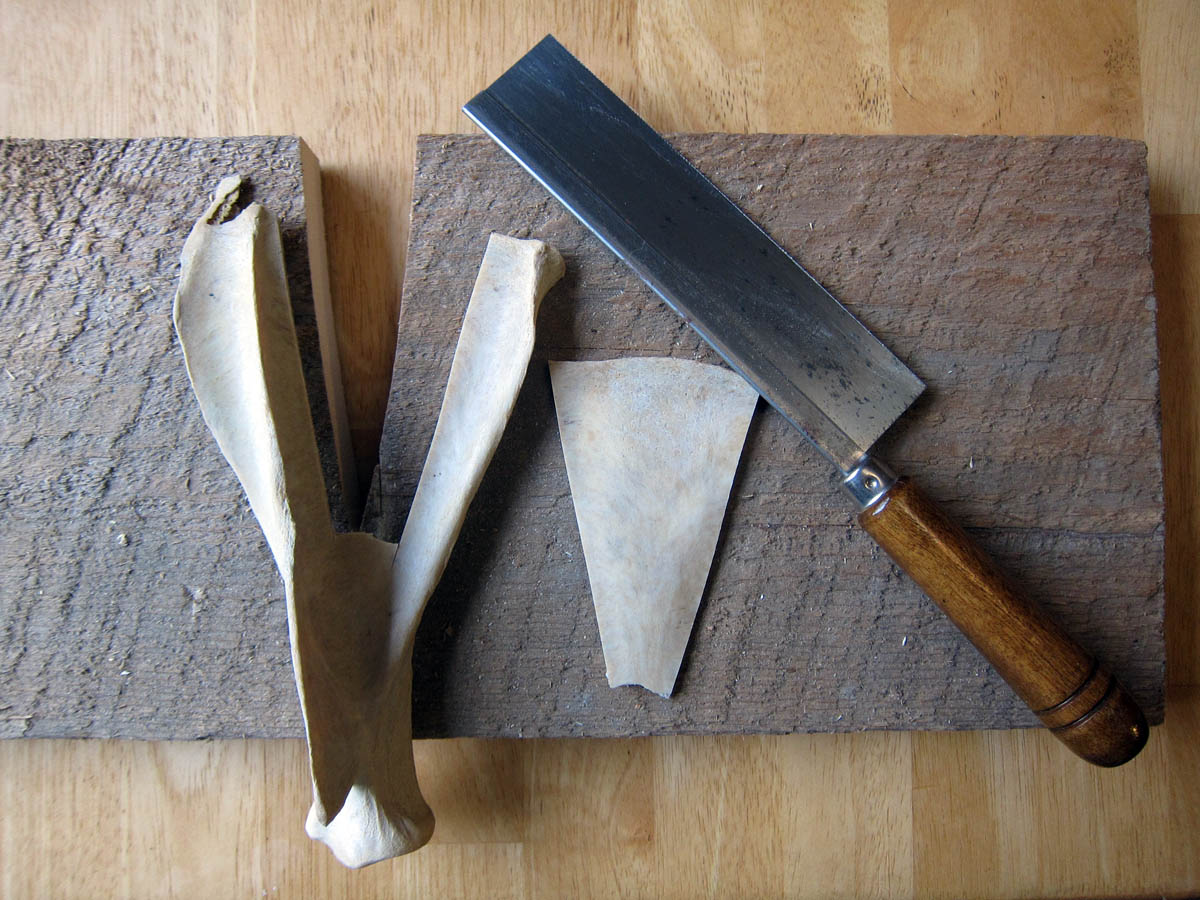
Figure 7: A saw jig to cut out the thin flat center piece from a shoulder blade.

This proved much more successful and I ended up with a nice thin and relatively flat triangle of bone large enough to cut a 4.2 x 4.2 cm square tablet. I then rounded off the corners, smoothed the edges and drilled the four holes in the same way as for the first tablet.

The final task was adding the incised decorations that drew my eye to the particular tablet found at Alchester, England (Figure 4 above). I first tried carving two concentric circles in a leftover part with two ring augers designed specifically for this task, a small one to carve the inner circle and a larger one for the outer circle. This immediately showed me that the larger auger created a center hole that would easily puncture completely through the thin bone tablet. So I decided to decorate the tablet only with smaller single circles at the same locations as the larger concentric double ones in the extant piece. I furthermore dispensed with the four additional smaller ones on the diagonals. The end result is a nice looking and fully functional bone tablet.

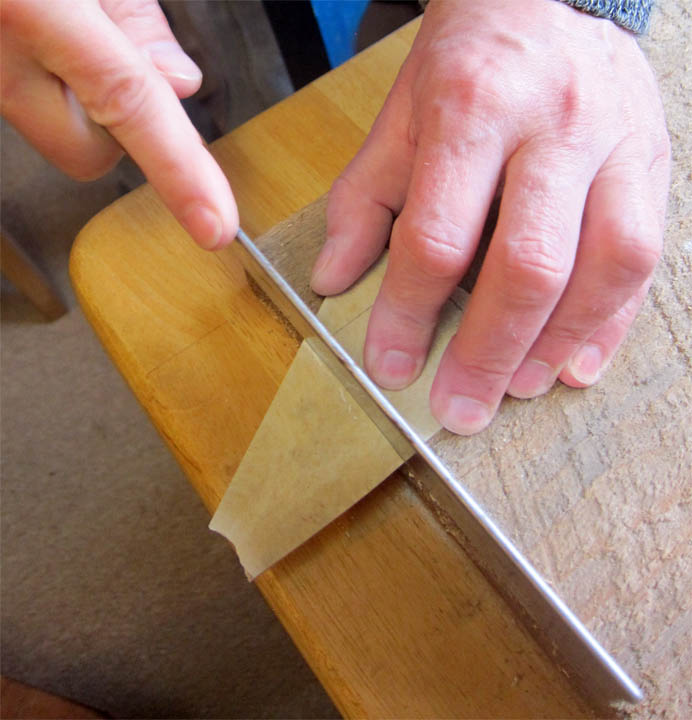
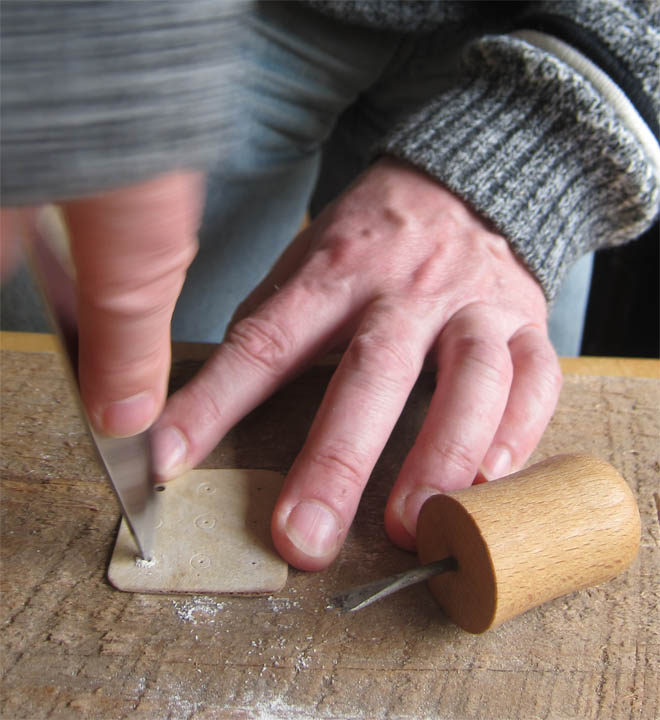
Figure 8: Cutting the tablet to size, rounding the corners and smoothing the edges, drilling the holes, and adding the decorations.

Learning points

Working with bone was an interesting new experience. It is much more fragile than I expected and has to be worked with care when using hand tools. Suitable tools make all the difference and the period hacksaw that we own proved too coarse for the task at hand. A modern, much finer dove tail saw was the solution, so I guess that just got added to my shopping list for period tools.

Find a downloadable version of this post at:
https://www.academia.edu/36500576/Making_bone_tablet_weaving_tablets

Bibliography

Arwidsson, Greta and Berg, Gosta (1999), The Mästermyr Find: A Viking Age Tool Chest from Gotland, Larson Publishing Company (Lompoc, CA)

Christensen, Arne Emil, and Nockert, Margareta (2006) Osebergfunnet – Bind IV Tekstilene, Museum of Cultural History (Oslo, Norway).

Collingwood, Peter (1982) The Techniques of Tablet Weaving, Echo Points Books & Media (Vermont).

Gillis, Carole, Nosch, Marie-Louise B. (ed.) (2003) Ancient Textiles: Production, Craft and Society. Proceedings of the First International Conference on Ancient Textiles, The Danish National Research Foundation Centre for Textiles, Oxbow Books (Oxford & Philadelphia).

Riley, Dennis (2014) Anglo-Saxon Tools, Anglo-Saxon Books, Lightning Source (Australia, England, USA).

Spies, Nancy (2000) Ecclesiastical Pomp & Aristocratic Circumstance - A Thousand Years of Brocaded Tabletwoven Bands, Arelate Studio (Maryland).

Tuesday, April 24, 2018

A 14th century Italian inspired greenbelt

I was asked by a friend within the SCA to weave a greenbelt for her prospective apprentice with a 14th century Italian persona and a research interest in medieval ornithology. So the search for suitable extant pieces from roughly the right time frame and geographic location began. Given her research interest I started looking for tablet woven bands with bird motifs. I found several appealing pieces that could be patterned for brocading and ended up using two of them. One inspired by a band patterned with peacocks and another from an intricately brocaded ribbon fragment with interesting geometrical patterns.


Historical Background

Finding tablet woven examples of extant pieces of band from the right time frame and geographic location proved to be somewhat non-trivial. I was only able to find evidence for a small number of fragments of tablet woven bands that are identified as Italian and dated to the neighborhood of the 14th century AD and none of them with bird motifs. Extending the search to brocaded fabrics with bird motives was more successful and one in particularly caught my attention: a silk fabric fragment in the collection of the Museum of Fine Arts in Boston with bands patterned with a row of peacocks facing each other in pairs (Figure 1).

Figure 1: Fragment with band patterned with peacocks.

The museum describes the medium and technique as “silk with alternating bands of weft patterned plain weave (draps d'areste), samite, and plain weave.” The fragment is classified as Italian or Spanish and dated to the 13th – 14th century AD.

The other piece that captured my eye was a fragment of a brocaded ribbon, classified as Italian and dated to the 13th – 14th century AD (Figure 2).

Figure 2: Fragment of a brocaded ribbon.

Technique, material and design

I decided to weave a brocaded band for three reasons: firstly, the fact that the most suitable fragment of tablet woven band was a brocaded ribbon (Figure 2); secondly, the relative ease of designing and brocading arbitrary motifs makes is possible to pattern the peacocks from the band in Figure 1; and thirdly, I simply enjoy brocading.

The first step in designing the belt was creating a pattern for the peacocks suitable to brocading. The extant piece is described as draps d'areste or cloth of aresta. Sophie Desrosiers et al. discuss a number of characteristics shared by cloths of aresta  among which one is a pattern repeat of two units, one straight and one reverse, and another is the characteristic herringbone pattern so evident in the close-up of the band in (Figure 3) which gives the cloth its name (arista is Latin for an ear of corn, but was also applied to a fish bone).

Figure 3: Close-up of the band with the peacocks.

The close-up of the band with the peacocks was loaded into Photoshop and viewed at varying pixel resolutions to arrive at a good compromise between the quality of the image and the number of pixels across the width of the band. The resulting pixilated image served as the basis for the brocading pattern for the peacocks. The band with the peacocks was woven in silk. The thread used to weave the brocaded ribbon was not specified in the catalogue information, but it is a reasonable assumption that such an intricate ribbon would have been woven in silk. So I decided to weave the belt in silk as well with its high strength and beautiful appearance as a welcome bonus. A previously brocaded belt in 20/2 silk taught me that I should expect a warp count of about 56/cm. With 37 tablets for the pattern and 3 on each side for the stave borders (as drawn in Figure 4) this should result in a width of about 3 cm, which was close to the width desired by my friend. So I settled on 20/2 silk for the warp and a total width of 43 tablets.

Figure 4: Brocading pattern of the peacock.

Next, I created a sequence of geometrical patterns inspired by the extant piece of brocaded ribbon in Figure 2 and used that to define the ends of the belt in a similar fashion as the often used metal end tips on a leather belt. However, the extend piece is only 8 mm wide and woven on 25 tablets for a warp count of 125/cm. Thus not only is the number of tablets almost twice as small as the 43 that was settled on above, the warp count is also a little more than twice that what I would expect for 20/2 silk. Clearly the warp thread in the extend piece is much thinner than what I plan to use for the belt. I therefore scaled the pattern to fit on the same 37 tablets with an additional 3 for the stave borders on each side to match the pattern for the peacock motif.

Figure 5: Brocading pattern for the end tips of the belt.

Weaving the belt

The band was woven on a warp weighted tablet weaving loom that I designed and build for an earlier project. The loom is designed to use on the top of a table, with the warp ends weighted down and dropping freely over the fixed rod at the end of the loom. The other end of the warp is attached to a ratcheted rod, which stores the finished band. The length of the finished band needed to be ca. 80 inch (including fringes). I warped the loom with a 135 inch long warp, allowing for losses at the start and end and for shortening due to twist. This was more than enough to create the required length of band, a sample for future reference and some room for testing. During weaving, the initial surplus length of warp was braided or looped to keep the warp ends suspended freely above the ground.

The warp was created one tablet at the time, threading back and forth twice per tablet. The tablets were warped alternating S and Z (to eliminate fouling of the warp threads during turns), mirrored with respect to the center. After warping the loom, I experimented a bit with warp tension and the thickness of the weft threads to get a roughly square pattern. As is common for brocaded bands, I used a thinner structural weft thread (60/2 silk), which helps in getting a tighter more well defined pattern. After some experimenting, I decided to use three 60/2 silk threads combined (not plied) for the brocading weft instead of the more typical single 20/2 silk thread (the same thread as the warp). I found this to give a smoother more even pattern and a better overall look of the motifs. Note that using multiple thinner threads was commonly used when brocading with silver or gold threads to get more even coverage, so using the same idea in this project has historical merit. I ended up using one individual weight of ca. 31 gram (a little over 1 ounce) tied to the four thread of each tablet, resulting in a tension of ca. 8 gram/thread.

The brocading weft was passed under two of the four threads of the cord creating a smooth and uniform underside. As in the original bands, all cards are collectively rotated forward one quarter turn for each successive passage of the ground and brocading weft. The unfinished warp ends were periodically untwisted to eliminate the build-up twist. The finished band was collected on the ratcheted rod at the near end of the loom. The braids at the end of the warp that stored the surplus warp were periodically unbraided to feed more warp while keeping the weights freely suspended.

A test weave of a brocaded peacock gave me a pattern length in the warp direction of ca. 1¾ inch or a weft count of ca. 22/inch. Assuming the same weft count for the end tip patterns gives an end tip length of ca. 4¾ inch, very similar to the length of a pair of peacocks with about an inch between them. This led me to a design of peacock pairs separated by a space between them that is roughly equal to that of a pair itself, such that they appear evenly spaced along the band. Two additional requirements were a target length without fringes of 75 inch and a design that was symmetric with respect to the middle of the band. These design requirements can be met with seven peacock pairs with 4⅜ inch between each pair and ⅞ inch between the two peacocks within a pair. This design was matched well once weaving was completed. The end tips ended up being a little shorter at about 4½ inch each, but the other elements where very close to the designed values. The total woven length was essentially the same as the target length of 75 inch. I added 3 inch of fringe at each end for a total length of 81 inch.


Find a downloadable version of this post at:
https://www.academia.edu/36492594/A_14th_century_Italian_inspired_greenbelt

Bibliography

Burchardt, Silvester (2016) Who’s afraid of brocade (class handout)

Collingwood, Peter (1982) The Techniques of Tablet Weaving, Echo Points Books & Media (Vermont)

Desrosiers, Sophie, Vial, Gabriel, and De Jonghe, Daniël (1989) Cloth of Aresta. A Preliminary Study of its Definition, Classification, and Method of Weaving, Textile History, Vol. 20 (2) pp. 199-223.

Spies, Nancy (2000) Ecclesiastical Pomp & Aristocratic Circumstance - A Thousand Years of Brocaded Tabletwoven Bands, Arelate Studio (Maryland).

Gold brocaded headband inspired by a find from the Shestovica cemetery; Second half 10th century AD, Chernigov, Ukraine

I was looking for a project to try something new with tablet weaving: brocading with metallic thread. A headband as part of the Wardrobe Pro...